
With the upcoming end-of-life for the VMware NSX Migration fo VMware Cloud Director that has been announced here the source code and all the released builds are now available publicly on Calsoft GitHub repository: https://github.com/Calsoft-Pvt-Ltd/NSX_V2T_Migration_Tool. Calsoft engineers were developing the tool from the beginning so they do have the expertese to maintain the code and support those service providers that have not been able yet to migrate. If you are such a provider I encourage you to contact Calsoft: techsupport@calsoftinc.com.
Tag: migration
VMware Cloud Director In-place Migration from NSX-V to NSX-T
VMware NSX Migration for VMware Cloud Director is a tool that automates migration of NSX-V backed Org VDCs to NSX-T backed provider VDC (PVDC). It is a side-by-side migration that requires standing up a new NSX-T cluster(s) to accommodate the migration. I described the process in my older blog.
However, there might be a situation that prevents this approach – either because hardware is not available or because only one cluster is available (VCD on top of VMware Cloud Foundation management domain).
We have derived and tested a procedure that enables in-place migration for such corner cases. It is not simple and requires the concurrent usage of NSX Migration Coordinator and NSX Migration for VCD. It also has some limitations but it can be an option when the regular side-by-site migration is not possible.
High Level Overview
At a high level the procedure is from VCD perspective still side by side and uses NSX Migration for VCD, but both source PVDC and target PVDC reside on the same cluster (with resource pool backing) while NSX Migration Coordinator is converting individual hosts from NSX-V to NSX-T and temporarily bridging VXLAN and Geneve networks.
Here are the high level steps:
- Make sure the source PVDC (NSX-V backed) has vSphere resource pool backing (instead of whole cluster). Also make sure VCD version is at least 10.4.2.2.
- Partially prepare target NSX-T Environment (deploy Managers and Edge Nodes)
- If load balancing is used, also partially prepare NSX ALB (deploy Controllers and configure NSX-T Cloud and Service Engine Groups)
- Create target PVDC NSX-T with resource pool backing on the same cluster
- Migrate network topology of all Org VDCs using the cluster with the NSX Migration for VCD (while using identical VNIs for the Geneve backed networks)
- Convert cluster ESXi hosts from NSX-V to T and migrate workloads to Geneve backed networks with NSX Migration Coordinator
- Migrate Org VDC network services with NSX Migration for VCD
- Migrate vApps with NSX Migration for VCD
- Clean up source Org VDCs with NSX Migration for VCD
- Clean up NSX-V from VCD and vCenter
Detailed Migration Steps
PVDC backing with Resource Pools
The source PVDC must be backed by resource pool (RP) otherwise we will not be able to create another PVDC on the same cluster. If the PVDC is using the whole cluster (its root RP) then it must be converted. The conversion is not so difficult but requires DB edit, therefore GSS support is recommended:
- Create a child RP under the vSphere cluster to be used as a PVDC RP.
- Move all PVDC child RPs (that were under the cluster directly, including System vDC RP) under this new RP.
- Note down the VC moref of this new RP.
- Update VCD vc_computehub and prov_vdc tables in VCD database to point the rp_moref to this new RP moref from VC (step 3).
If necessary, upgrade VCD to version 10.4.2.2 or newer.
Prepare NSX-T Environment
- Deploy NSX-T Managers
- Deploy NSX-T Edge Nodes. Note that the Edge node transport zone underlay (transport) VLAN must be routable with the existing VXLAN underlay (transport) VLAN (or it must be the same VLAN). The ESXi hosts when converted by NSX Migration Coordinator will reuse the VXLAN transport VLAN for its TEP underlay.
- Make sure that Geneve overlay ID VNI Pool interval contains the VXLAN VNIs used in NSX-V


- Create overlay transport zone
- Register NSX-T manager to VCD
- Register VC as Compute Manager in NSX-T Manager
- Create Geneve backed network pool in VCD (utilizing transport zone from step #4)
- Create Tier-0 and VRF gateways as necessary based on your desired target topology
- Create provider gateways in VCD using Tier-0 or VRF GWs created in step #8
Prepare NSX ALB Environment (optional)
This step is necessary only if load balancing is used.
- Deploy Avi Controllers and import the Avi Controller Cluster into VCD
- Prepare management segment and Tier-1 GW for Avi NSX-T Cloud
- Set up NSX-T Cloud in Avi and import it into VCD. Note that the Avi Controller will indicate the NSX-T Cloud is in red state as there are no NSX-T backed ESXi hosts in the environment yet.
- Set up Service Engine Groups as necessary and import them into VCD
Create Target Provider VDC
- In vCenter create sibling resource pool next to the RP backing the source PVDC
2. In VCD create the target NSX-T backed PVDC backed by the RP created in step #1 while using the Geneve backed network pool created previously. Yes it is possible this way to create NSX-T backed PVDC on NSX-V prepared cluster.

Topology Migration
With NSX Migration for VCD perform prechecks for all Org VDCs using the cluster. Skip bridging assessment as it is not necessary.
vcdNSXMigrator.exe –filepath=sampleuserinput.yml –passwordFile=passfile –preCheck -s bridging
If there are no issues, process with creation of target Org VDC network topology again for all Org VDCs on the cluster. In the input YAML file include CloneOverlayIds=TRUE line which will ensure that target networks use the same Overlay IDs as the source networks. This will allow Migration Coordinator associate the right networks.
If the topology includes direct VLAN backed Org VDC networks then also use LegacyDirectNetworks=TRUE. This statement will force NSX Migration for VCD to reuse the existing DVS portgroup backed external networks in the target Org VDCs. You also need to make sure that each such parent external network is used more than just one Org VDC network (for example via a dummy temporary Org VDC), otherwise the migration would be using the “Imported NSX-T Segment” mechanism which would not work as there is no ESXi host available yet that could access NSX-T Segment. See below table from the official doc:

The topology migration is triggered with the following command (must be run for each Org VDC):
vcdNSXMigrator.exe –filepath=sampleuserinput.yml –passwordFile=passfile -e topology
At this stage workloads are still running on NSX-V prepared hosts and are connected to VXLAN/VLAN backed port groups. The target Org VDCs are created and their network topology (Edge GWs and networks) exists only on Edge Transport Nodes as none of the resource ESXi hosts are yet prepared for NSX-T.
Note that you should not use Edge subinterface connection on source Org VDCs networks as it will not work later with Migration Coordinator. Also note that distributed routed networks on source side will experience extended downtime during migration as Migration Coordinator bridging will not work for them. You can convert them to direct interface Edge connectivity or alternatively accept the downtime.
Routed vApps (that use vApp Edge) should be powered off (undeployed). This is because vApp networks are not migrated during topology migration and thus will not exist during the Migration Coordinator step.
Migration Coordinator
In this step we will convert NSX-V hosts to NSX-T. This is done with NSX Migration Coordinator which will sequentially put each ESXi host into maintenance mode, evacuate the VMs (and connect them to VXLAN or Geneve networks) to other hosts. Then it will uninstall NSX-V and install NSX-T vibs on the host and bridge VXLAN and Geneve overlays directly in VMkernel.
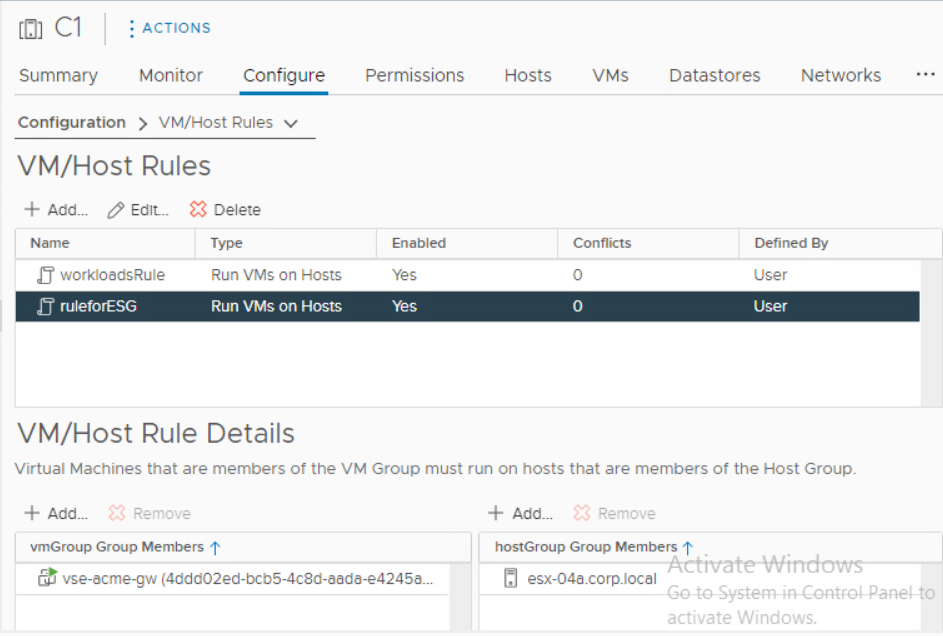
When done, from vCenter perspective workloads will end up on the target networks but from VCD perspective they are still running in the source Org VDCs! The routing and other network services will still be performed by source Edge Gateways. In order to later migrate network services to NSX-T Tier-1 GWs, we must make sure that source Edge Service Gateway VMs stay on NSX-V prepared host so they are still manageable by NSX-V Manager (which uses ESXi host VIX/message bus communication). This is accomplished by creating vCenter DRS affinity groups.
- Create DRS host group named EdgeHost that contains the last host in the cluster
- Create DRS host group named WorkloadHosts that contains all other hosts in the cluster
- Create DRS VM group named EdgeVMs that contains all ESG VMs
- Create DRS VM group named WorkloadVMs that containts all VCD managed workloads
- Create DRS VM/Host must rule for all EdgeVMs to run on EdgeHost
- Create DRS VM/Host must rule for all WorkloadVMs to run on Workload hosts
- Make sure that DRS vMotions all VMs as required (if you are using ESGs in HA configuration disable antiaffinity on them).
Now we can start the Migration Coordinator conversion:
8. Enable Migration Coordinator on one of the NSX-T Manager Appliances via CLI command start service migration-coordinator

9. Access the NSX-T appliance via web UI and go to System > Lifecycle Management > Migrate and select the Advanced Migration mode DFW, Host and Workload.

- Import the source NSX-V configuration by connecting the vCenter and providing NSX-V credentials:

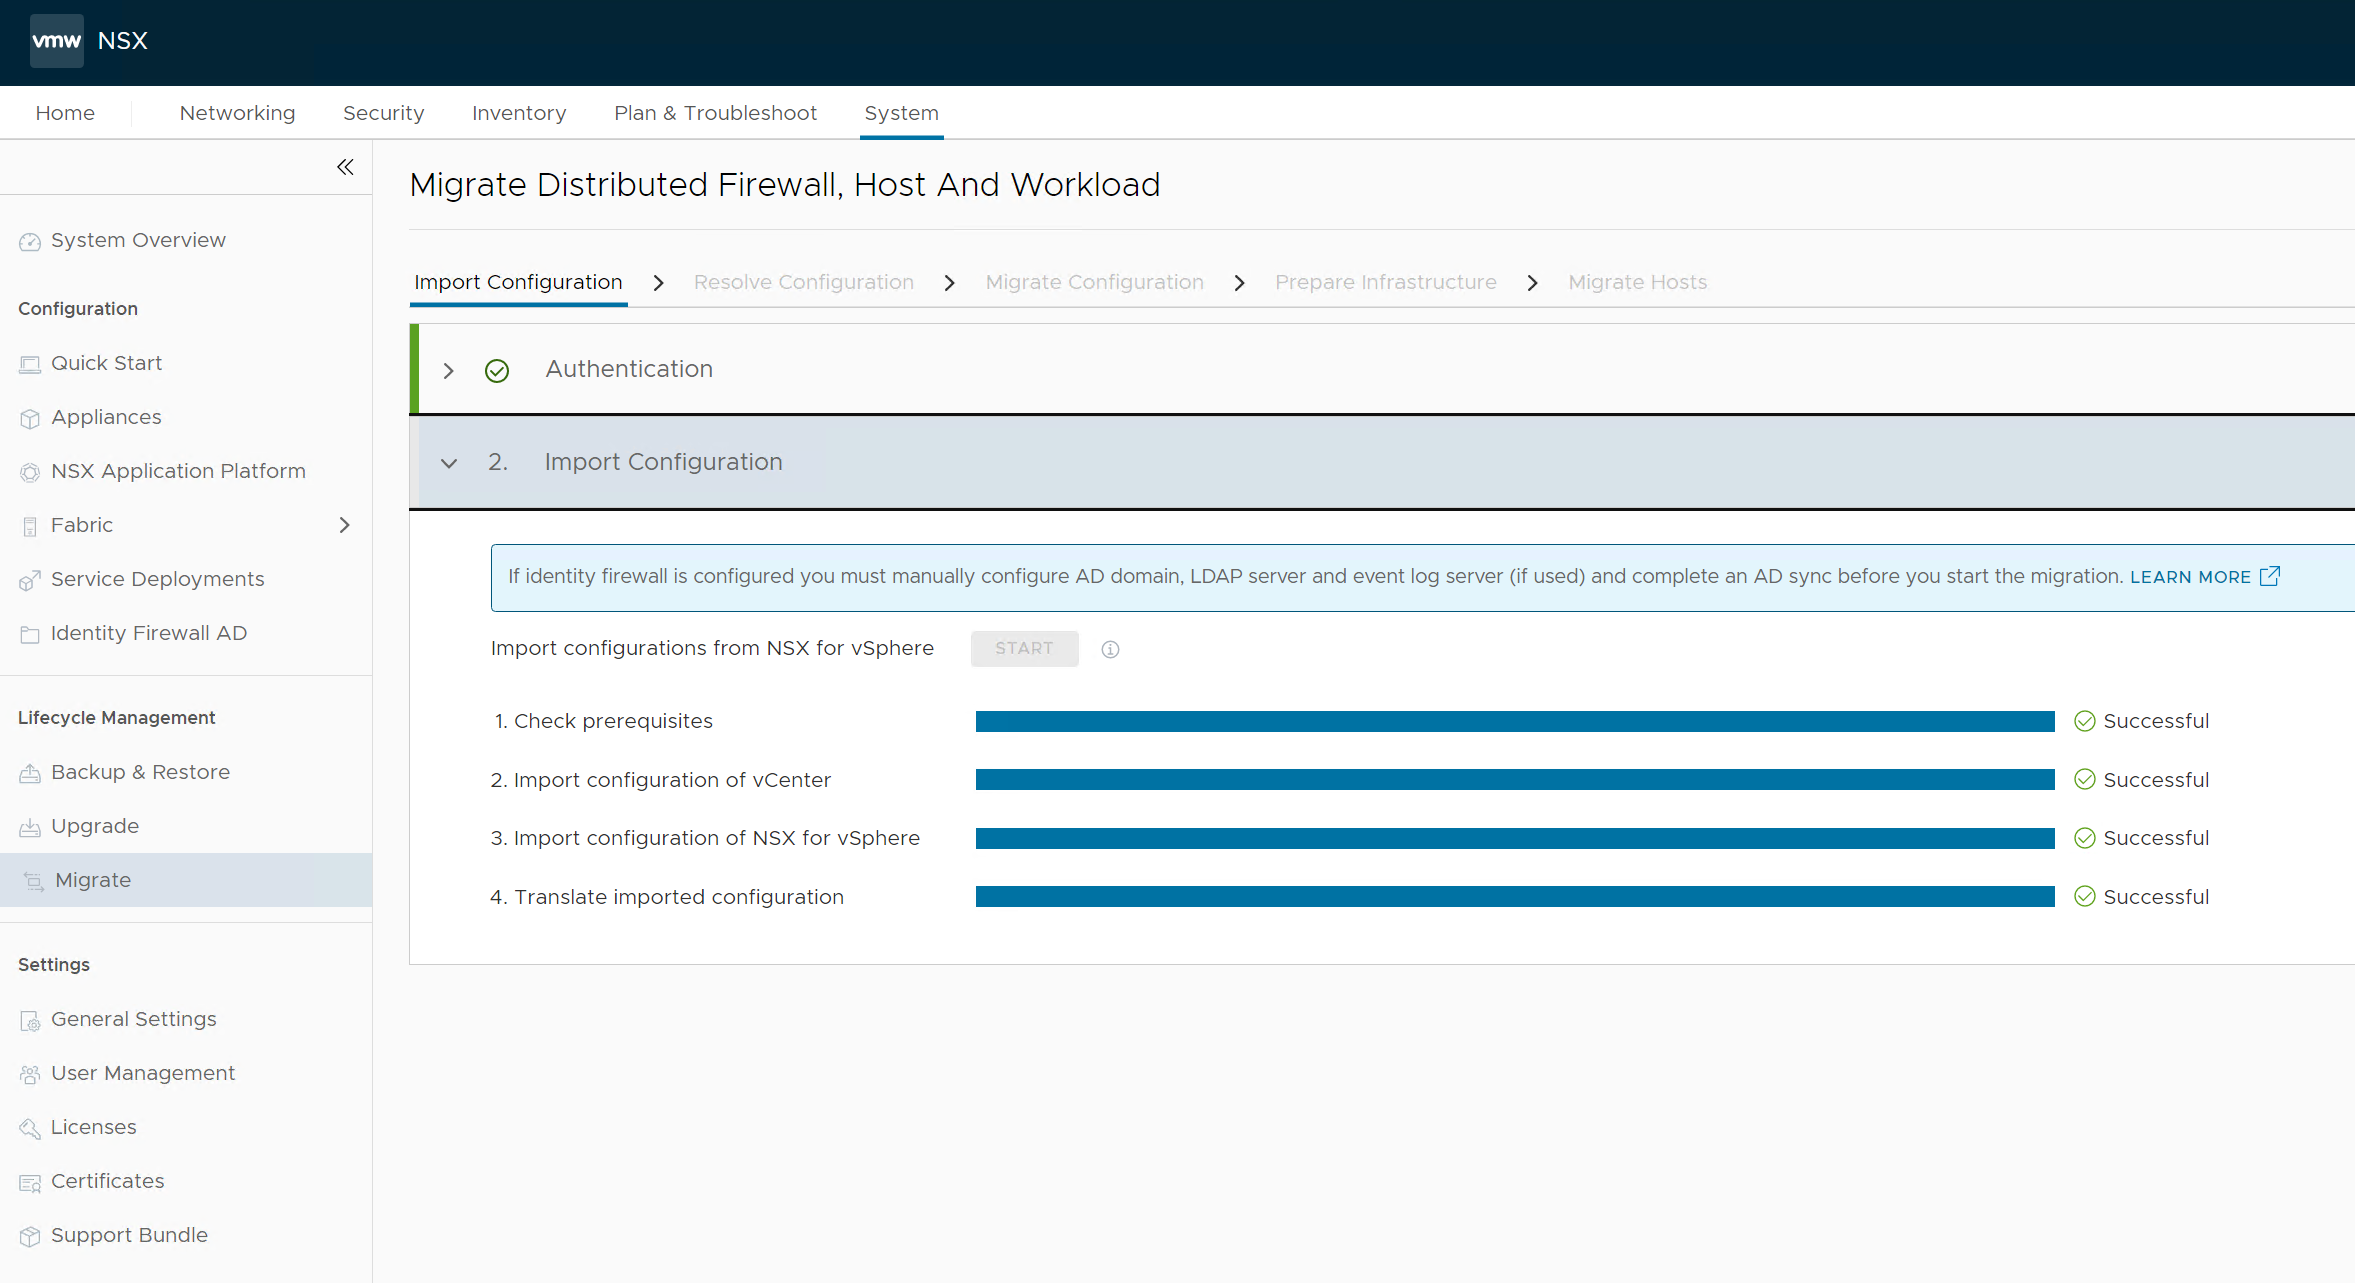
- Continue to resolving configuration issues. Accept the recommendations provided by the Migration Coordinator.
Note: The Migration Coordinator does not recognize the topology created by VCD hence there may be unknown objects like security groups in case DFW is used in VCD. We accept all the recommendations by the Migration Coordinator which is to skip the DFW rules migration. Not to worry, DFW will be migrated by NSX Migration for VCD in a later step. - Next we migrate configuration:


- Prepare infrastructure in the next step:

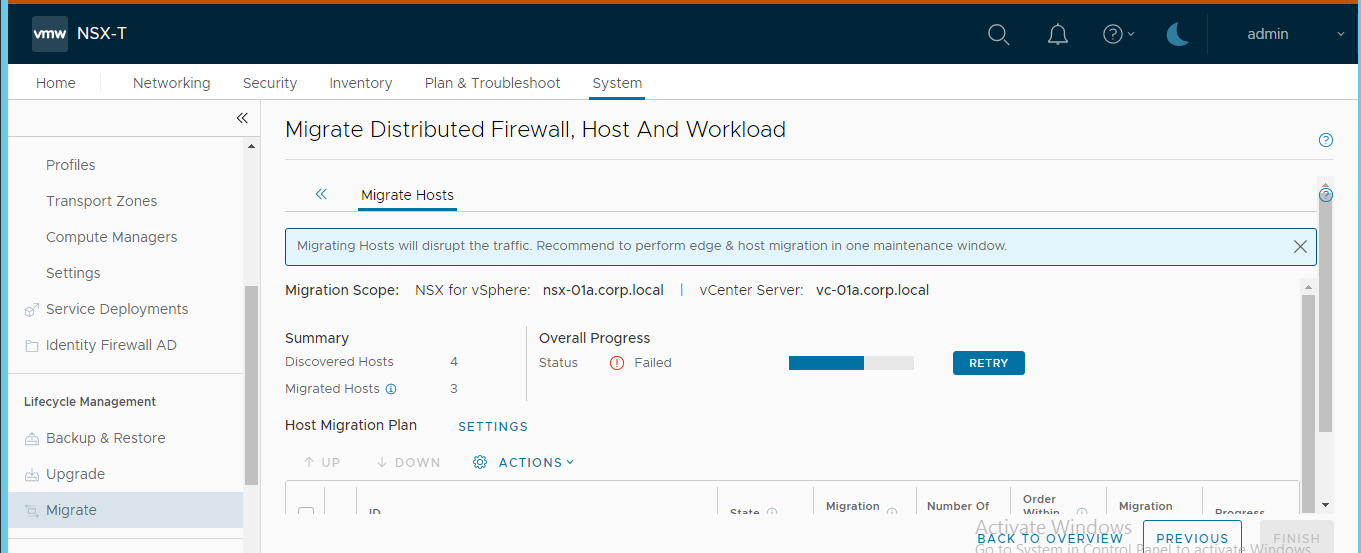
- And finally we arrive at Migrate Host step where the conversion of each ESXi host is performed. Make sure the ESG designated host is last in the sequence. Note that there is no rollback from this step on. So make sure you have tested this process in lab environment and you know what you are doing.

Either use Pause in between host option or let the migration run until the last host conversion. We will pause there (or cancel the VC action that tries unsuccessfully to put the ESG designated host into maintenance mode as there are DRS pinned VMs on it.

Network Services Migration and VCD vApp Reconciliation
Next, we need to migrate network services from NSX-V ESGs to Tier-1 GWs, migrate DFW and finally from VCD perspective migrate vApps to target Org VDCs.
For each Org VDC perform network services migration:
vcdNSXMigrator.exe –filepath=sampleuserinput.yml –passwordFile=passfile -e services
N/S network disconnection will be performed. NSX-V Edge Gateways will be disconnected from external networks. Source Org VDC networks will be disconnected from their NSX-V Edge Gateways and target Org VDC networks will be connected to NSX-T Tier-1 GWs and Tier-1 GWs will be connected to Tier-0 gateway. If LB is used the Service Engine deployment will happen during the phase automatically by Avi Controller.
For each Org VDC perform vApp migration step:
vcdNSXMigrator.exe –filepath=sampleuserinput.yml –passwordFile=passfile -e movevapp
Clean-up Phase
- Clean up all source Org VDCs with:
vcdNSXMigrator.exe –filepath=sampleuserinput.yml –passwordFile=passfile –cleanup - As the previous step deleted all NSX-V ESGs we can go back to NSX Migration Coordinator and convert the remaining host to NSX-T. We can also remove all DRS rules that we created for ESGs and VCD Workloads.

- Disable and remove source Provider VDC.
- In case there are no more NSX-V backed provider VDCs in the environment remove VXLAN network pools and unregister NSX-V from VCD as described here.
- If you migrated your last NSX-V cluster perform NSX-V cleanup from vSphere as described here: https://docs.vmware.com/en/VMware-NSX-T-Data-Center/3.2/migration/GUID-7A07429B-0576-43D0-8808-77FA7189F4AE.html
How to Move (Live) vApps Across Org VDCs
VMware Cloud Director has secret not well known API only feature that allows to move vApps across Org VDCs while they are running. This feature has been purposefully made for the NSX-V to NSX-T Migration Tool, but can be used for other use cases hence the reason here to shed more lights on it.
We should start with mentioning that vApp migration across Org VDCs has been around since forever – in the UI you can select an existing vApp and you will find out Move command in the action menu. But that is something completely different – that method does in the background (vSphere) cloning operation with deletion of the source VM(s). Thus it is slow, requires vApp to be powered off and creates new identity for the vApp and VMs after the move (their UUIDs will change). The UI is using API method POST /vdc/{id}/action/cloneVApp with flag IsSourceDelete set to true.

So the above method is *not* the subject of this article – instead we will talk about API method POST /VDC/{id}/action/moveVApp.
The main differences are:
- vMotion (e.g. live, share nothing and cross vCenter) is used
- identity of vApp and VM does not change (UUID is retained)
- vApp can be in running state
- VMs can be connected to Named (independent) disks
- Fast provisioning (linked clones) support
The moveVApp API is fairly new and still evolving. For example VMware Cloud Director 10.3.2 added support for move router vApps. Movement of running encrypted vApps will be supported in the future. So be aware there might be limitations based on your VCD version.
The vApp can be moved across Org VDCs/Provider VDCs/clusters, vCenters of the same tenant but it will not work across associated Orgs for example. It also cannot be used for moving vApps across clusters/resource pools in the same Org VDC (for that use Migrate VM UI/API). Obviously the underlying vSphere platform must support vMotions across the involved clusters or vCenters. NSX backing (V to T) change is also supported.
The API method is using the target Org VDC endpoint with quite elaborate payload that must describe which vApp is being moved, how will the target network configuration look like (obviously parent Org VDC networks will change) and what storage, compute or placement policies will be used by every vApp VM at the target.
Note that if a VM is connected to a media (ISO) it must be accessible to the target Org VDC (the ISO is not migrated).
An example is worth 1000 words:
POST https://{{host}}/api/vdc/5b2abda9-aa2e-4745-a33b-b4b8fa1dc5f4/action/moveVApp

Content-Type:application/vnd.vmware.vcloud.MoveVAppParams+xml
Accept:application/*+xml;version=36.2

<?xml version="1.0"?>
<MoveVAppParams xmlns="http://www.vmware.com/vcloud/v1.5" xmlns:ns7="http://schemas.dmtf.org/ovf/envelope/1" xmlns:ns8="http://schemas.dmtf.org/wbem/wscim/1/cim-schema/2/CIM_ResourceAllocationSettingData" xmlns:ns9="http://www.vmware.com/schema/ovf">
  <Source href="https://vcd-01a.corp.local/api/vApp/vapp-96d3a015-4a08-4c59-93fa-384b41d4e453"/>
  <NetworkConfigSection>
    <ns7:Info>The configuration parameters for logical networks</ns7:Info>
       <NetworkConfig networkName="vApp-192.168.40.0">
            <Configuration>
                <IpScopes>
                    <IpScope>
                        <IsInherited>false</IsInherited>
                        <Gateway>192.168.40.1</Gateway>
                        <Netmask>255.255.255.0</Netmask>
                        <SubnetPrefixLength>24</SubnetPrefixLength>
                        <IsEnabled>true</IsEnabled>
                        <IpRanges>
                            <IpRange>
<StartAddress>192.168.40.2</StartAddress>
<EndAddress>192.168.40.99</EndAddress>
                            </IpRange>
                        </IpRanges>
                    </IpScope>
                </IpScopes>
                <ParentNetwork href="https://vcd-01a.corp.local/api/admin/network/1b8a200b-7ee7-47d5-81a1-a0dcb3161452" id="1b8a200b-7ee7-47d5-81a1-a0dcb3161452" name="Isol_192.168.33.0-v2t"/>
                <FenceMode>natRouted</FenceMode>
                <RetainNetInfoAcrossDeployments>false</RetainNetInfoAcrossDeployments>
                <Features>
                    <FirewallService>
                        <IsEnabled>true</IsEnabled>
                        <DefaultAction>drop</DefaultAction>
                        <LogDefaultAction>false</LogDefaultAction>
                        <FirewallRule>
                            <IsEnabled>true</IsEnabled>
                            <Description>ssh-VM6</Description>
                            <Policy>allow</Policy>
                            <Protocols>
<Tcp>true</Tcp>
                            </Protocols>
                            <DestinationPortRange>22</DestinationPortRange>
                            <DestinationVm>
<VAppScopedVmId>88445b8a-a9c4-43d5-bfd8-3630994a0a88</VAppScopedVmId>
<VmNicId>0</VmNicId>
<IpType>assigned</IpType>
                            </DestinationVm>
                            <SourcePortRange>Any</SourcePortRange>
                            <SourceIp>Any</SourceIp>
                            <EnableLogging>false</EnableLogging>
                        </FirewallRule>
                        <FirewallRule>
                            <IsEnabled>true</IsEnabled>
                            <Description>ssh-VM5</Description>
                            <Policy>allow</Policy>
                            <Protocols>
<Tcp>true</Tcp>
                            </Protocols>
                            <DestinationPortRange>22</DestinationPortRange>
                            <DestinationVm>
<VAppScopedVmId>e61491e5-56c4-48bd-809a-db16b9619d63</VAppScopedVmId>
<VmNicId>0</VmNicId>
<IpType>assigned</IpType>
                            </DestinationVm>
                            <SourcePortRange>Any</SourcePortRange>
                            <SourceIp>Any</SourceIp>
                            <EnableLogging>false</EnableLogging>
                        </FirewallRule>
                        <FirewallRule>
                            <IsEnabled>true</IsEnabled>
                            <Description>Allow all outgoing traffic</Description>
                            <Policy>allow</Policy>
                            <Protocols>
<Any>true</Any>
                            </Protocols>
                            <DestinationPortRange>Any</DestinationPortRange>
                            <DestinationIp>external</DestinationIp>
                            <SourcePortRange>Any</SourcePortRange>
                            <SourceIp>internal</SourceIp>
                            <EnableLogging>false</EnableLogging>
                        </FirewallRule>
                    </FirewallService>
                    <NatService>
                        <IsEnabled>true</IsEnabled>
                        <NatType>portForwarding</NatType>
                        <Policy>allowTraffic</Policy>
                        <NatRule>
                            <Id>65537</Id>
                            <VmRule>
<ExternalIpAddress>192.168.33.2</ExternalIpAddress>
<ExternalPort>2222</ExternalPort>
<VAppScopedVmId>e61491e5-56c4-48bd-809a-db16b9619d63</VAppScopedVmId>
<VmNicId>0</VmNicId>
<InternalPort>22</InternalPort>
<Protocol>TCP</Protocol>
                            </VmRule>
                        </NatRule>
                        <NatRule>
                            <Id>65538</Id>
                            <VmRule>
<ExternalIpAddress>192.168.33.2</ExternalIpAddress>
<ExternalPort>22</ExternalPort>
<VAppScopedVmId>88445b8a-a9c4-43d5-bfd8-3630994a0a88</VAppScopedVmId>
<VmNicId>0</VmNicId>
<InternalPort>22</InternalPort>
<Protocol>TCP</Protocol>
                            </VmRule>
                        </NatRule>
                    </NatService>
                </Features>
                <SyslogServerSettings/>
                <RouterInfo>
                    <ExternalIp>192.168.33.2</ExternalIp>
                </RouterInfo>
                <GuestVlanAllowed>false</GuestVlanAllowed>
                <DualStackNetwork>false</DualStackNetwork>
            </Configuration>
            <IsDeployed>true</IsDeployed>
        </NetworkConfig>
  </NetworkConfigSection>
  <SourcedItem>
    <Source href="https://vcd-01a.corp.local/api/vApp/vm-fa47982a-120a-421a-a321-62e764e10b80"/>
    <InstantiationParams>
      <NetworkConnectionSection>
        <ns7:Info>Network Connection Section</ns7:Info>
        <PrimaryNetworkConnectionIndex>0</PrimaryNetworkConnectionIndex>
                <NetworkConnection network="vApp-192.168.40.0" needsCustomization="false">
                    <NetworkConnectionIndex>0</NetworkConnectionIndex>
                    <IpAddress>192.168.40.2</IpAddress>
                    <IpType>IPV4</IpType>
                    <ExternalIpAddress>192.168.33.3</ExternalIpAddress>
                    <IsConnected>true</IsConnected>
                    <MACAddress>00:50:56:28:00:30</MACAddress>
                    <IpAddressAllocationMode>POOL</IpAddressAllocationMode>
                    <SecondaryIpAddressAllocationMode>NONE</SecondaryIpAddressAllocationMode>
                    <NetworkAdapterType>VMXNET3</NetworkAdapterType>
                </NetworkConnection>
      </NetworkConnectionSection>
    </InstantiationParams>
    <StorageProfile href="https://vcd-01a.corp.local/api/vdcStorageProfile/bdf68bda-8ab9-4ec1-970a-fafc34cdcf5b"/>
  </SourcedItem>
    <SourcedItem>
    <Source href="https://vcd-01a.corp.local/api/vApp/vm-a1f87b29-60e7-45ee-86e2-5b749a81ed19"/>
    <InstantiationParams>
      <NetworkConnectionSection>
        <ns7:Info>Network Connection Section</ns7:Info>
        <PrimaryNetworkConnectionIndex>0</PrimaryNetworkConnectionIndex>
                <NetworkConnection network="vApp-192.168.40.0" needsCustomization="false">
                    <NetworkConnectionIndex>0</NetworkConnectionIndex>
                    <IpAddress>192.168.40.3</IpAddress>
                    <IpType>IPV4</IpType>
                    <ExternalIpAddress>192.168.33.2</ExternalIpAddress>
                    <IsConnected>true</IsConnected>
                    <MACAddress>00:50:56:28:00:37</MACAddress>
                    <IpAddressAllocationMode>POOL</IpAddressAllocationMode>
                    <SecondaryIpAddressAllocationMode>NONE</SecondaryIpAddressAllocationMode>
                    <NetworkAdapterType>VMXNET3</NetworkAdapterType>
                </NetworkConnection>
      </NetworkConnectionSection>
    </InstantiationParams>
    <StorageProfile href="https://vcd-01a.corp.local/api/vdcStorageProfile/bdf68bda-8ab9-4ec1-970a-fafc34cdcf5b"/>
  </SourcedItem>
</MoveVAppParams>
In our case this is routed two VM vApp where both VMs are connected to the same routed vApp network named vApp-192.168.40.0 with set of port forwarding NAT rules and FW policies configured on the vApp router.
- As said above it is a POST call against the target Org VDC – in our case 5b2abda9-aa2e-4745-a33b-b4b8fa1dc5f4.
- The payload starts with the source vApp (vapp-96d3a015-4a08-4c59-93fa-384b41d4e453).
- The follows the NetworkConfig section. Here we are describing the target vApp network topology. In general that section should be identical to the source vApp payload with the only difference being the ParentNetwork must refer to an Org VDC network from the target Org VDC. So in our case we are describing the subnet and IP pools of the vApp network (vApp-192.168.40.0), its new parent Org VDC network (Isol_192.168.33.0-v2t) and the way these two are connected (bridged or natRouted). As we are using routed vApp it is natRouted in our case. Then follow (optional) routed vApp features such as firewall policies or NAT rules. They should be pretty self explanatory and again they are usually identical to the source vApp section from the NetworkConfig. Note that VM object rules use VAppScopedVmId that is random looking UUID that changes every time the vApp is moved.
We should highlight that IP addresses allocated to the vApp (its VMs or vApp routers) from the source Org VDC network are retained during the migration (and must be available in the target Org VDC network static IP pool). - After the NetworkConfigSection follow details of every vApp VM (SourcedItem) – to which vApp network(s) defined above the VM network interface(s) will connect (with which IP/MAC and IPAM mode) and which storage, placement and compute policies (StorageProfile, VdcComputePolicy and ComputePolicy) it should use. For the NIC section you usually take the source VM equivalent info. The vApp network name must be the one defined in the NetworkConfig section. For the policies you must obviously use target Org VDC policies as these will change.
- BTW storage policy can be also defined at the disk level with DiskSetting element (the followin excerpt shows when named disk is connected)
            <DiskSettings>
                <DiskId>2016</DiskId>
                <SizeMb>8</SizeMb>
                <UnitNumber>0</UnitNumber>
                <BusNumber>1</BusNumber>
                <AdapterType>3</AdapterType>
                <ThinProvisioned>true</ThinProvisioned>
                <Disk href="https://vcd-01a.corp.local/api/disk/567bdd04-4905-4a62-95e7-9f4850f85240" id="urn:vcloud:disk:567bdd04-4905-4a62-95e7-9f4850f85240" type="application/vnd.vmware.vcloud.disk+xml" name="Disk1"/>
                <StorageProfile href="https://vcd-01a.corp.local/api/vdcStorageProfile/1f8bf2df-d28c-4bec-900c-726f20507b5b"/>
                <overrideVmDefault>true</overrideVmDefault>
                <iops>0</iops>
                <VirtualQuantityUnit>byte</VirtualQuantityUnit>
                <resizable>true</resizable>
                <encrypted>false</encrypted>
                <shareable>false</shareable>
                <sharingType>None</sharingType>
            </DiskSettings>
The actual vApp migration triggers async operation that takes some time to complete. If you observe what is happening in VCD and vCenter you will see that a new temporary “-generated” vApp is created in the target Org VDC with the VMs being first migrated there. In case of routed vApps the vApp routers (edge service gateways or Tier-1 gateways) must be deployed as well. When all the vApp VMs are moved the source vApp is removed and the target vApp with the same identity is created and the VMs from generated vApp are relocated there. If all goes as expected the generated vApp is removed.
Shout-out to Julian – the engineering brain behind this feature.
How to Migrate VMware Cloud Director from NSX-V to NSX-T (part 2)
This is an update of the original article with the same title published last year How to Migrate VMware Cloud Director from NSX-V to NSX-T and includes the new enhancements of the VMware NSX Migration for VMware Cloud Director version 1.2.1 that has been released yesterday.
The tool’s main purpose is to automate migration of VMware Cloud Director Organization Virtual Data Centers that are NSX-V backed to a NSX-T backed Provider Virtual Data Center. The original article describes how exactly it is accomplished and what is the impact of migrated workloads from the networking and compute perspective.
The migration tool is continually developed and additional features are added to either enhance its usability (improved roll back, simplified L2 bridging setup) or to support more use cases based on new features in VMware Cloud Director (VCD). And then there is a new assessment mode! Let me go into more details.
Directly Connected Networks
The VCD release 10.2.2 added support to use in NSX-T backed Org VDCs directly connected Organization VDC networks. Such networks are not connected to a VDC Gateway and instead are just connected directly to a port group backed external network. The typical usage is for service networks, backup networks or colocation/MPLS networks where routing via the VDC Gateway is not desired.
The migration tool now supports migration of these networks. Let me describe how it is done.
The VCD external network in NSX-V backed PVDC is port group backed. It can be backed by one or more port groups that are typically manually created VLAN port groups in vCenter Server or they can also be VXLAN backed (system admin would create NSX-V logical switch directly in NSX-V and then use its DVS port groups for the external network). The system administrator then can create in the Org VDC a directly connected network that is connected to this external network. It inherits its parent’s IPAM (subnet, IP pools) and when tenant connects a VM to it it is just wired to the backing port group.
The migration tool first detects if the migrated Org VDC direct network is connected to an external network that is also used by other VDCs and based on that behaves differently.
Colocation / MPLS use case
If the external network is not used by any other Org VDC and the backing port group(s) is VLAN type (if more port groups are used they must have the same VLAN), then it will create in NSX-T logical segment in VLAN transport zone (specified in the YAML input spec) and import it to the target Org VDC as imported network. The reason why direct connection to external network is not used is to limit the external network sprawl as the import network feature perfectly matches the original use case intent. After the migration the source external network is not removed automatically and the system administrator should clean them up including the vCenter backing port groups at their convenience.
Note that no bridging is performed between the source and target network as it is expected the VLAN is trunked across source and target environments.
The diagram below shows the source Org VDC on the left and the target one on the right.

Service Network Use Case
If the external network is used by other Org VDCs, the import VLAN segment method cannot be used as each imported Org VDC network must be backed by its own logical segment and has its own IPAM (subnet, pool). In this case the tool will just create directly connected Org VDC network in the target VDC connected to the same external network as the source. This requires that the external network is scoped to the target PVDC – if the target PVDC is using different virtual switch you will need first to create regular VLAN backed port group there and then add it to the external network (API only currently). Also only VLAN backed port group can be used as no bridging is performed for such networks.

Assessment Mode
The other big feature is the assessment mode. The main driver for this feature is to enable service providers to see how much ready their environment is for the NSX-V to T migration and how much redisign will be needed. The assessment can be triggered against VCD 10.0, 10.1 or 10.2 environments and only requires VCD API access (the environment does not yet need to be prepared for NSX-T).
The tool will during the assessment check all or specified subset of NSX-V backed Org VDCs and assess every feature used there that impacts its migration viability. Then it will provide detailed and summarized report where you can see what ratio of the environment *could* be migrated (once upgraded to the latest VCD 10.2.2). This is provided in Org VDC, VM and used RAM units.
The picture below shows example of the summary report:

Note that if there is one vApp in a particular Org VDC that cannot be migrated, the whole Org VDC is counted as not possible to migrate (in all metrics VM and RAM). Some features are categorized as blocking – they are simple not supported by either NSX-T backed Org VDC or the migration tool (yet), but some issues can be mitigated/fixed (see the remediation recommendations in the user guide).
Conclusion
As mentioned the migration tool is continuosly developed and improved. Together with the next VMware Cloud Director version we can expect additional coverage of currently unsupported features. Especially the shared network support is high on the radar.
Import Running VM to vCloud Director
Another nice little feature in the recently released vCloud Director 8.10 (read eight dot ten) is the ability to import running VM under vCloud Director management.
In the past the vCloud system administrator could import virtual machine running in vCloud Director managed vSphere environment, however that VM had to be turned off.

Now in vCloud DIrector 8.10 the VM can be running which enables new use cases:
- You can take existing vSphere environment under management of vCloud Director without impacting the workloads. Example would be going from vSphere only managed services to self service with vSphere + vCloud Director
- Migrations of running VMs from vSphere to vCloud Director or between vCloud Directors. Cross vCenter Server vMotion nicely complements this feature. Cross-Cloud vMotion.
There are currently some limitations and considerations:
- It is API only feature. The GUI button (above) can be used to import only powered-off VMs.
- VM must be running on resources that are available to the Org VDC where it is being imported. That includes compute (cluster), storage policies and network port group. Obviously the networking is the most complex to get it right during the migration and requires some thought.
- Import of VM with IDE controller is not supported.
- A new vApp is created for the imported VM. You cannot import VM to an existing vApp.
- As an input to the API call MoRef ID of the VM must be provided. The existing vCloud API call to list vSphere VMs outside of vCloud Director management however does not list running VMs. Therefore the MoRef ID must be acquired with vSphere API.
Example:
POST https://vcd-01a.corp.local/api/admin/extension/vimServer/3702cc8f-c23f-4a66-b9f3-73fc4b58ba82/importVmAsVApp

Accept: application/*+xml;version=20.0
x-vcloud-authorization: 3e131f9e3bc240269a7758fdb6c1bf7f
Content-type: application/vnd.vmware.admin.importVmAsVAppParams+xml


<?xml version="1.0" encoding="UTF-8"?>
<ImportVmAsVAppParams xmlns="http://www.vmware.com/vcloud/extension/v1.5" name="ImportedTestVM" sourceMove="true">
   <VmMoRef>vm-86</VmMoRef>
   <Vdc href="https://vcd-01a.corp.local/api/vdc/a10bdf92-18dc-474b-aafc-42d31ba83207" />
</ImportVmAsVAppParams>
